
Crispy Gluten-Free Chicken Katsu is a Japanese dish that combines a crunchy coating with tender chicken. This dish is a must-make for those who love bold flavors and crave the satisfying crunch of perfectly fried chicken. The gluten-free twist ensures that everyone can enjoy this classic comfort food without compromise. As a chef, discovering this dish was a revelation, showcasing how traditional techniques can be adapted for modern dietary needs without losing any of the original charm.
Why I Love This Recipe
I first encountered Chicken Katsu during a culinary journey through Japan, where the art of frying is revered. The gluten-free adaptation of this dish is fascinating because it captures the essence of Japanese comfort food while being accessible to those with dietary restrictions. The use of rice flour instead of traditional breadcrumbs creates an unexpectedly light and crispy texture that envelops the juicy chicken. It reminds me of the bustling streets of Tokyo, where the aroma of fried foods fills the air. As a professional chef, I find the balance of flavors and textures in this dish to be a delightful challenge, and it never fails to impress guests with its simplicity and depth.
What You Need From Your Kitchen
Deep Fryer
Essential for achieving the perfect crispy texture in the katsu
Meat Thermometer
Ensures the chicken is cooked to the ideal internal temperature
Sharp Knife
For precise slicing of the chicken, ensuring even cooking
Mixing Bowls
Necessary for preparing the gluten-free batter and coating
Tongs
Useful for safely handling the hot, fried chicken pieces.
Perfect Pairings
Steamed Jasmine Rice
Complements the rich flavors of the katsu with its subtle aroma
Cabbage Slaw
Adds a refreshing crunch and balances the dish's richness
Sake
Enhances the umami flavors with its smooth, slightly sweet profile
Miso Soup
Provides a comforting, savory contrast to the crispy katsu
Green Tea
Cleanses the palate and highlights the dish's delicate flavors.

Pro Tips
- Pound the chicken to an even thickness for uniform cooking. This ensures the meat stays juicy while achieving a perfect crispy crust.
- Use a gluten-free flour blend to coat the chicken before dipping in egg. This helps the panko adhere better, enhancing the crunch.
- Fry the chicken in small batches to prevent the oil temperature from dropping. This keeps the coating crispy and golden brown.
🍳 Your Cooking Progress
Ingredients Gathered
0/12 CompleteCooking Steps
0/6 CompleteRecipe Mastery
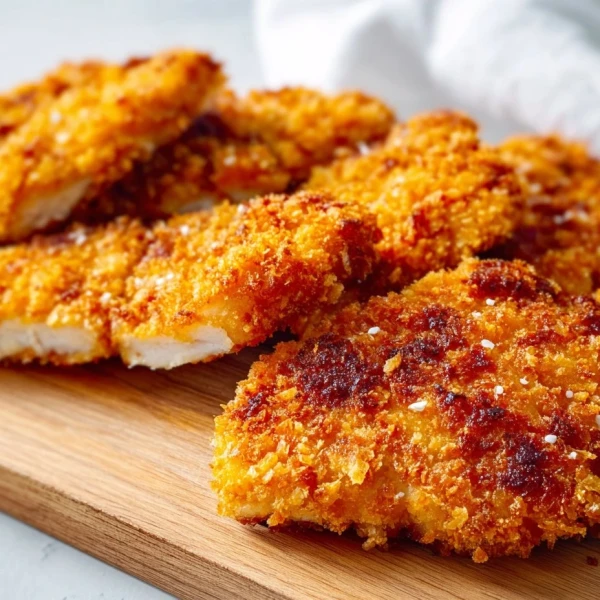
0% CompleteCrispy Gluten-Free Chicken Katsu
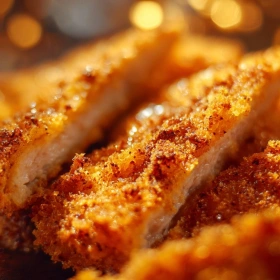
What sets this Gluten-Free Chicken Katsu apart is the use of rice flour, creating a light, crispy coating. The juicy chicken inside contrasts beautifully with the crunchy exterior, making it a must-try.
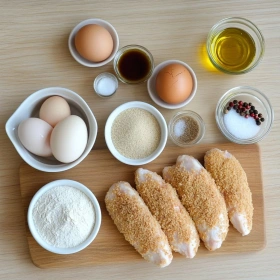
Ingredients
💡 Click on ingredients to check them off!
- 4 boneless, skinless chicken breasts
- 1 cup gluten-free breadcrumbs
- 1/2 cup gluten-free flour
- 2 large eggs, beaten
- 1 teaspoon garlic powder
- 1 teaspoon onion powder
- 1/2 teaspoon salt
- 1/4 teaspoon black pepper
- 1/4 cup vegetable oil
- 1 tablespoon soy sauce
- 1 tablespoon mirin
- 1 teaspoon sugar
Instructions
💡 Click on steps to mark as complete!
-
1Prepare the chickenPound chicken breasts to an even thickness for uniform cooking. This ensures a juicy interior.
-
2Season the flourMix flour with garlic powder, onion powder, salt, and pepper. This adds layers of flavor to the crust.
-
3Set up the dredging stationArrange flour, beaten eggs, and breadcrumbs in separate shallow dishes for efficient coating.
-
4Coat the chickenDredge chicken in flour, dip in egg, then press into breadcrumbs, ensuring an even crust.
-
5Fry the chickenHeat oil in a skillet over medium heat. Fry chicken until golden brown and crispy, about 4 minutes per side.
-
6Make the sauceCombine soy sauce, mirin, and sugar in a small pan. Simmer until slightly thickened, enhancing the umami.
Nutrition Facts (Per Serving)
Chef's Notes
- Store leftover chicken katsu in an airtight container in the fridge for up to 3 days. Reheat in the oven to maintain crispiness.
- For a make-ahead option, bread the chicken and freeze it uncooked. Fry directly from frozen for a quick meal.
- Substitute gluten-free panko with crushed gluten-free cornflakes for an extra crunchy texture.
- If you run out of gluten-free soy sauce, tamari is a perfect substitute that retains the dish's authentic flavor.