
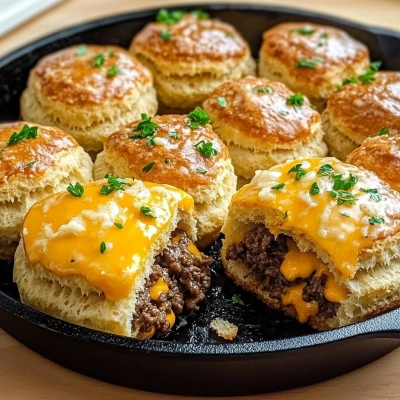
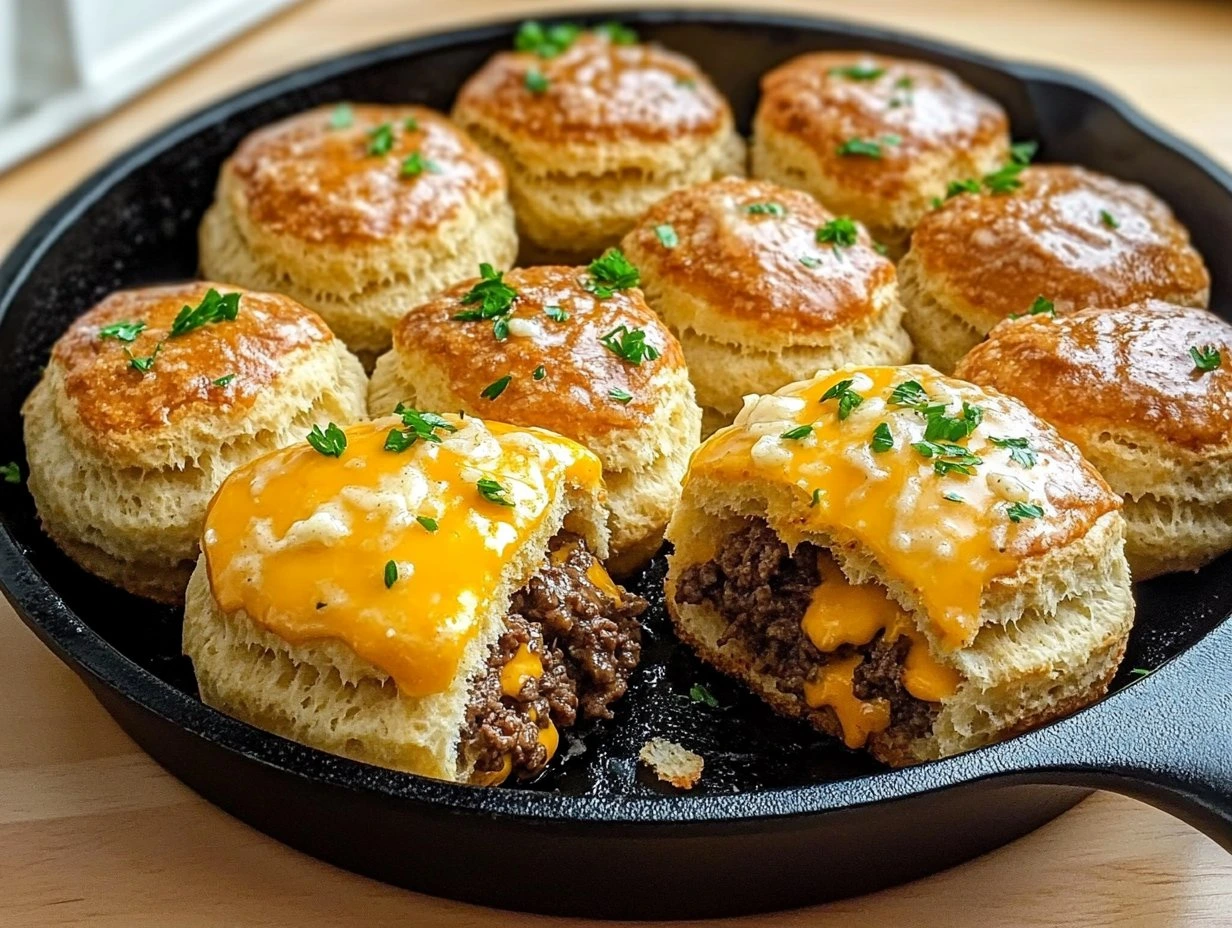
Garlic Parmesan Cheeseburger Bombs are a brilliant mash-up of juicy cheeseburger flavor and tender, pull-apart pastry. Make them because they turn simple ingredients into a dramatic, crowd-pleasing bite with crisp, golden tops and a molten, beefy center. The first time I pulled one apart, the steam carried garlic, butter, and browned beef straight to the senses, and I was hooked. They’re the kind of dish that feels playful yet precise, with every bite delivering crunch, richness, and that satisfying cheese pull chefs love.
Why I Love This Recipe
What fascinates me about Garlic Parmesan Cheeseburger Bombs is how they borrow from so many culinary traditions at once: the comfort of American diner burgers, the buttery richness of baked bread, and the satisfying sealed-pocket technique you see in hand pies and stuffed buns around the world. There’s real craft in getting the filling seasoned just right, then enclosing it so the dough bakes up airy while the center stays juicy. I still remember the first tray I made on a busy weekend service test—when the tops turned lacquered and bronze, the kitchen smelled like garlic toast and a burger grill at once. That’s the magic here: familiar, but elevated by technique.

What You Need From Your Kitchen
Baking sheet or cast-iron skillet
Gives the bombs enough surface contact to brown the bottoms while keeping the dough structure intact
Skillet
Essential for cooking and reducing the beef filling so excess moisture doesn’t burst the dough
Pastry brush
Lets you coat each bomb evenly with garlic butter for that glossy, savory finish
Small scoop or spoon
Helps portion the filling consistently so every bomb bakes at the same rate
Parchment paper
Prevents sticking and makes cleanup easy after the cheese melts and caramelizes
Perfect Pairings
Crisp dill pickles
Their briny snap cuts through the buttery dough and rich beef, refreshing the palate between bites
Tomato basil soup
The bright acidity and silky texture make a cozy contrast to the cheesy, savory bombs
Cold lager or amber ale
The carbonation and gentle malt balance the garlic-Parmesan richness beautifully
Game day platter
Serve alongside celery sticks, ranch, and fries for a fun, crowd-friendly spread
Simple green salad
Peppery greens and a sharp vinaigrette keep the meal lively and balanced
Pro Tips
- Brown the beef until deeply caramelized, not just cooked through. Those browned bits build the savory backbone of the filling and keep the bombs tasting like a real cheeseburger, not a bland meat pocket.
- Let the filling cool before assembling. Warm filling softens the dough too quickly, which can cause splitting, poor sealing, and cheese leakage during baking.
- Seal each bomb with the seam tucked underneath and a tight pinch around the edges. That hidden seam helps the dough expand upward in the oven while keeping the molten center trapped inside.
- Brush generously with garlic butter after baking, not before. Post-bake brushing preserves the biscuit’s lift and gives you a fragrant, glossy finish with a more pronounced Parmesan aroma.
- Bake on a preheated sheet or dark pan if possible. The extra bottom heat encourages a crisp, golden base so the underside stays sturdy enough to support the juicy beef and melted cheese.
🍳 Your Cooking Progress
Ingredients Gathered
0/12 CompleteCooking Steps
0/7 CompleteRecipe Mastery
0% CompleteGarlic Parmesan Cheeseburger Bombs
Garlic Parmesan Cheeseburger Bombs bring together flaky biscuit dough, seasoned ground beef, and sharp cheese in a clever stuffed-bake. The garlic butter finish and Parmesan crust create a deeply savory, bakery-style aroma that makes them impossible to resist.
Ingredients
💡 Click on ingredients to check them off!
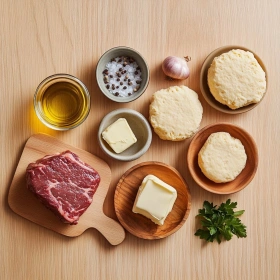
- 1 pound ground beef
- 1 tablespoon extra-virgin olive oil
- 1 small yellow onion, finely diced
- 2 cloves garlic, minced
- 1 teaspoon kosher salt
- 1/2 teaspoon freshly ground black pepper
- 1 tablespoon Worcestershire sauce
- 1 cup shredded sharp cheddar cheese
- 1 can refrigerated biscuit dough, 8 biscuits
- 2 tablespoons unsalted butter, melted
- 2 tablespoons finely grated Parmesan cheese
- 1 tablespoon chopped fresh parsley
Instructions
💡 Click on steps to mark as complete!
-
1Build the savory fillingWarm the olive oil in a skillet over medium-high heat, then sauté the onion until translucent and fragrant. Add the garlic and ground beef, breaking it up finely so the texture stays tender, not chunky. Cook until browned and no longer pink.
-
2Season with depthStir in salt, black pepper, and Worcestershire sauce, letting the beef absorb that classic burger savoriness. Cook off excess moisture so the filling stays concentrated and won't steam the biscuit dough. Remove from the heat and cool slightly before assembling.
-
3Prepare the biscuit roundsSeparate the biscuit dough and flatten each piece into a 4-inch round with your fingertips or a rolling pin. Aim for even thickness so the bombs bake uniformly. Keep the centers slightly thicker than the edges for a secure seal.
-
4Fill and seal carefullySpoon a portion of beef into the center of each round, then top with shredded cheddar for that molten, stretchy finish. Gather the dough edges up and pinch firmly to enclose the filling completely, smoothing the seam underneath for a neat shape.
-
5Arrange for even bakingPlace each sealed bomb seam-side down in a greased baking dish or cast-iron skillet, leaving a little space between them so hot air can circulate. Brush the tops lightly with melted butter to encourage a deep golden crust and rich flavor.
-
6Finish with garlic ParmesanCombine the remaining melted butter with Parmesan and parsley, then brush generously over the hot dough as soon as it comes out of the oven. The residual heat blooms the garlic aroma and helps the cheese cling in a glossy, savory layer.
-
7Bake to golden perfectionBake at 375°F until the biscuits are puffed and deeply browned, and the bottoms sound hollow when tapped. Let them rest briefly before serving so the cheese settles slightly, giving you a cleaner bite and a luscious, juicy center.
Nutrition Facts (Per Serving)
Chef's Notes
- These Garlic Parmesan Cheeseburger Bombs hold beautifully in the refrigerator for up to 3 days. Reheat in a hot oven so the biscuit exterior regains its crisp, bronzed shell instead of turning soft and steamy.
- For make-ahead prep, cook the beef filling completely and chill it before stuffing. A cool filling stays compact, keeps the dough from tearing, and helps the cheese melt into a creamy center rather than leaking out.
- If you want a sharper, more savory finish, swap part of the cheddar for provolone or mozzarella. Cheddar gives that classic burger bite, while a milder cheese creates a silkier, more molten pull.
- These bombs freeze well after baking. Cool them fully, wrap individually, and freeze in a single layer first so the buttery garlic-Parmesan crust stays intact and doesn’t pick up freezer odors.
- For best texture after storage, avoid microwaving if possible. A few minutes in the oven or air fryer revives the flaky biscuit layers and brings back the garlicky aroma that makes this dish so irresistible.